- Basics of Arduino Coding
- How to use Android Phone to write codes and upload in Arduino?
- Effective coding techniques in Arduino: More about datatypes
- Effective coding techniques in Arduino: More about variables
- How to design Cathode Ray Oscilloscope using Arduino? Code of just 9 lines!
- How to start learning NodeMCU in simple steps? Basic Tutorial on NodeMCU
- How to use array to rotate servo motor in different angles?
- Blinking LED code for Arduino in Assembly Language Programming (ALP)
- Having trouble to drive Servo motor with Arduino Uno SMD? Get perfect solution now…
- Optimized Obstacle-Avoiding Robot Code: A Breakthrough for Robotics Enthusiasts
An array is a collection of values which are accessed with an index number. Any value in the array may be called in the program by calling the name of the array and the index number of the value.
The students who studied Python programming at Vidyasagar Academy will understand array and its indexing more easily.
The indexing of array starts from 0 i.e. the first value in the array begins at index number 0. An array needs to be declared and optionally assigned values before they can be used.
int arrayname[] = {value0, value1, value2...}Likewise it is possible to declare an array by declaring the array type and size and later assign values to an index position:
int arrayname [5]; // declares integer array with 6 positions
arrayname [3] = 10; // assigns the 4th index the value 10
To retrieve or call a value from an array, assign a variable to the array and index position:
x = arrayname [3]; // x will be equal to 10Arrays are often used in for loops, where the increment counter is also used as the index position for each array value.
The following example uses an array to rotate the servo motor, connected to pin-3 of Arduino UNO or Arduino Nano in different angles from 0 degree to 180 degree in steps of 30 degrees.
Precautions
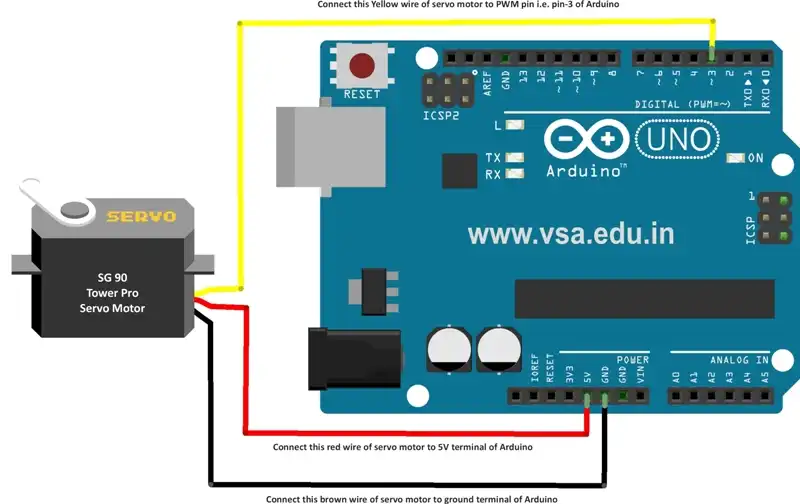
Refer below given connection diagram to connect servo motor pins properly. Otherwise the servo motor and Arduino will get damaged.

- Connect red wire of servo motor to 5V pin of Arduino
- Connect black/brown wire of servo motor to Gnd pin of Arduino
- Connect yellow/orange wire of servo motor to pin-10 (or any other pin like 3,5,6,9,10,11) of Arduino as these six pins work as PWM pins.
On these PWM pins the analogWrite function is used to set the duty cycle of a PWM pulse train that operates at approximately 500 Hz. Thus, with a frequency fc = 500Hz, the period is Tc = 1/fc ∼ 2ms. For more details of PWM function, read this article.
The Code
#include <Servo.h>
Servo i; // servo motor input pin
int count=0;
int angle[] = {0,30,60,90,120,150,180};
void setup()
{
  i.attach(3);
}
void loop()
{
  for(count=0;count<6;count++)
  {
    i.write(angle[count]);
    delay(1000);
  }
}
Connection Diagram
