- Basics of Arduino Coding
- How to use Android Phone to write codes and upload in Arduino?
- Effective coding techniques in Arduino: More about datatypes
- Effective coding techniques in Arduino: More about variables
- How to design Cathode Ray Oscilloscope using Arduino? Code of just 9 lines!
- How to start learning NodeMCU in simple steps? Basic Tutorial on NodeMCU
- How to use array to rotate servo motor in different angles?
- Blinking LED code for Arduino in Assembly Language Programming (ALP)
- Having trouble to drive Servo motor with Arduino Uno SMD? Get perfect solution now…
- Optimized Obstacle-Avoiding Robot Code: A Breakthrough for Robotics Enthusiasts
Fundamentals of NodeMCU
NodeMCU is an open-source firmware, meaning it’s freely available to use, modify and distribute. It is based on ESP8266 chip. It runs on the ESP8266 Wi-Fi SoC (System on a Chip) and it provides Wi-Fi connectivity and a microcontroller in a single package.
LUA scripting language: You can program NodeMCU using the LUA scripting language, which is known for its simplicity and ease of learning.
Key features
NodeMCU comes with lots of features within a single package.
- It provides direct Wi-Fi connectivity.
- It has general purpose input/output (GPIO) pins for interfacing with sensors, actuators and other electronics devices and circuits.
- It has inbuilt analog-to-digital converter (ADC) for reading analog input signals.
- It has serial communication protocols (UART, SPI, I2C) for data exchange with other devices like another NodeMCU or Arduino.
- It has very low power consumption.
How to Start Learning NodeMCU
First gather the necessary hardware as listed below. You can get it from any electronics shop or search for it online on the sites like www.robomart.com or www.robosapi.com
- NodeMCU development board (available online for affordable prices)
- Micro-USB cable for power and programming
- Breadboard and jumper wires for prototyping
- Optional: sensors, LEDs, or other components for experimentation
Install the software
To program the NodeMCU you will require the Arduino IDE software. This is a popular and user-friendly environment for programming microcontrollers, including NodeMCU. Download it from this link.
After installing the software, Arduino IDE, you will have install the ESP8266 board package.
For that follow this procedure.
- Open the Arduino IDE software. In the menu, click on File > Preferences > Settings
- Then paste following link into the “Additional Boards Manager URLs” field, and click “OK.”
http://arduino.esp8266.com/stable/package_esp8266com_index.json
- Then in menu again click on Tools > Board > Boards Manager and then search for “esp8266” and install the package by clicking on the “Install” button.
Let us write first program
Now you are ready to write your first program for your NodeMCU board.
- Start with simple examples like blinking an LED or reading sensor data.
- Use resources like the official NodeMCU documentation and online tutorials.
- Explore the Arduino IDE’s examples and libraries for NodeMCU.
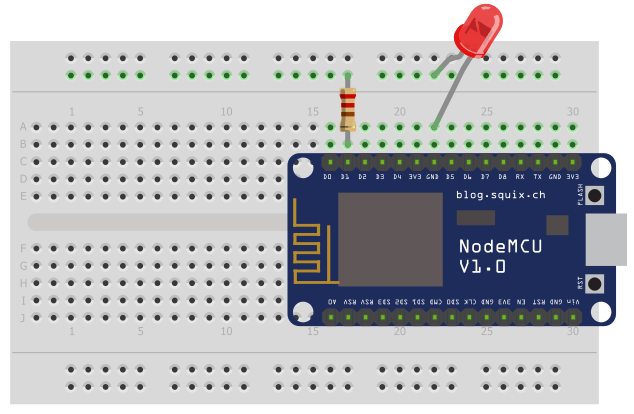
Circuit Diagram
Build this simple circuit on small breadboard and then upload the code in NodeMCU.
Example Code
 #define LED D1 // connect external LED to pin D1 with resistor
 void setup()
 {
  pinMode(LED, OUTPUT); // LED pin as output.
 }
 void loop()
 {
  // Note that the pins in NodeMCU are acive low on the ESP8266
  digitalWrite(LED, HIGH); // turn the LED off - there is no typing mistake here!
  delay(1000);
  digitalWrite(LED, LOW); // turn the LED on - there is no typing mistake here!
  delay(1000); // wait for 1 second.
 }
Contact us to get free guidance from our expert faculties!