- AR-B1: Blinking LED Project using Arduino
- AR-B2: Alternate Control of LED & Buzzer
- AR-B3: Alternate Blinking LEDs
- AR-B4: Running Effect of LEDs
- AR-B5: Chasing Effect of LEDs
- AR-B6: Obstacle Detector using IR Sensor
- AR-B7: Object Counter using Serial Monitor
- AR-B8: Servo Motor Basic Code
- AR-B10: Car Wiper System using Servo Motor
- B13: LED Display Down Counter with Alarm using Arduino
- Protected: Day-1: Online Course on Arduino Programing with Practicals
- Protected: Day-2: Online Course on Arduino Programing with Practicals
- Protected: Day-3: Online Course on Arduino Programing with Practicals
In this code the servo motor is controlled in required angle. We can change the value of the angle in the code either positive or negative angle.
Required Material
Arduino UNO Board – 1, data cable – 1, Servo Motor – 1, Jumper wires – 3.
Working
Servo motor is used in humanoid robots and automatic machines in industries. Servo motor rotates only from 0° to 180° i.e. half circle. When you upload the code in Arduino, the motor start rotating. First it resets back to 0° from any previous position. Then after 1 second it turns in 90° and then after 1 second again it rotates in 90° and finally it comes back to 0°.
Precautions
- DO NOT ROTATE THE SHAFT OF THE SERVO MOTOR WITH YOUR HANDS. IT WILL DAMAGE THE SERVO MOTOR.
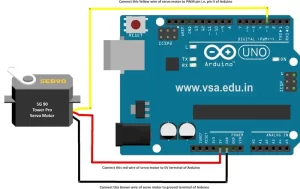
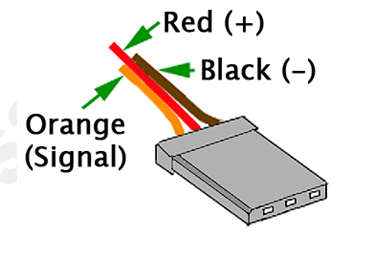
- Connect the orange wire of servo motor to any Pulse Width Modulation pin i.e. PWM pin like pin-3, pin-5, pin-6, pin-9, pin-10 or pin-11. These pins are marked as (~) on the Arduino board.
Procedure
- After uploading the code, connect the 3 wires of servo motor as shown in the diagram on next page.
- Then connect Arduino to USB port through data cable.
- The motor will start rotating as per the angles set in the program.
The Code
Servo motor is very useful in robotics to get the machine level action of a robotic arm or automated system. Just copy the following code and upload in Arduino UNO to run the project successfully.
#include <Servo.h>
Servo i;

void setup()
{
  i.attach(3);
}

void loop()
{
  i.write(0);
  delay(1000);
  i.write(90);
  delay(1000);
  i.write(180);
  delay(1000);
}
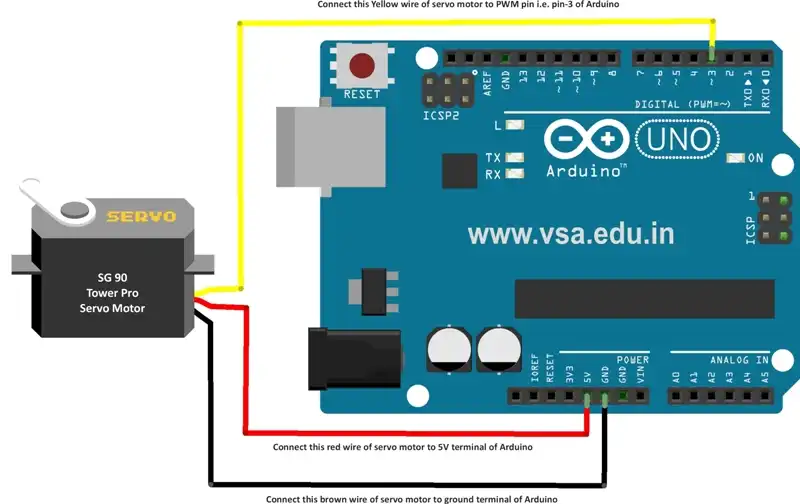
Circuit Diagram
This circuit diagram is applicable to all the servo motor projects in this series.
Important Note: Project #B9 is removed due to similar content like B8