- AR-B1: Blinking LED Project using Arduino
- AR-B2: Alternate Control of LED & Buzzer
- AR-B3: Alternate Blinking LEDs
- AR-B4: Running Effect of LEDs
- AR-B5: Chasing Effect of LEDs
- AR-B6: Obstacle Detector using IR Sensor
- AR-B7: Object Counter using Serial Monitor
- AR-B8: Servo Motor Basic Code
- AR-B10: Car Wiper System using Servo Motor
- B13: LED Display Down Counter with Alarm using Arduino
- Protected: Day-1: Online Course on Arduino Programing with Practicals
- Protected: Day-2: Online Course on Arduino Programing with Practicals
- Protected: Day-3: Online Course on Arduino Programing with Practicals
This code is used to beep the buzzer when obstacle is detected by the IR sensor in front of it. When there is no obstacle, the buzzer remains OFF.
Page Contents
show
Required Material
Arduino UNO Board – 1, data cable – 1, IR Sensor – 1, Buzzer – 1, Jumper wires – 5.
Working
After uploading the code in Arduino UNO board, place your palm near the IR sensor. This will make output of IR sensor LOW and the buzzer will be ON. When you remove your palm, the buzzer will be OFF.
The Code
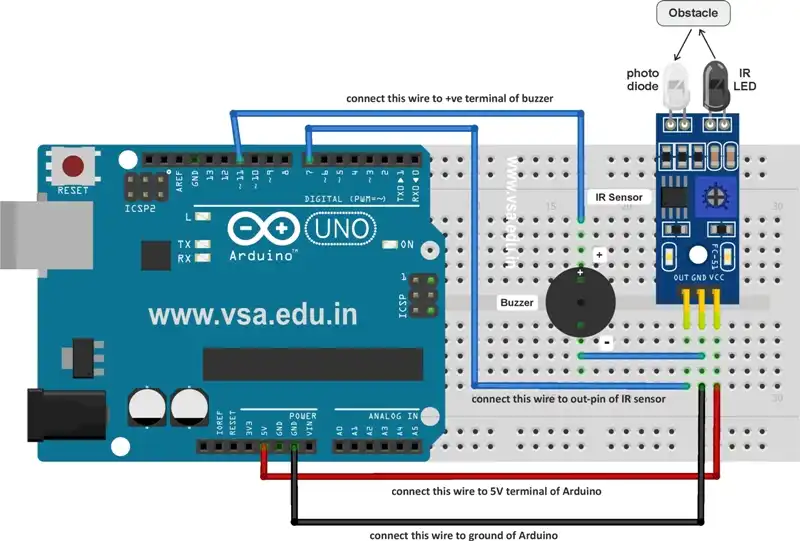
This code detects the obstacle in front of IR sensor. First upload the following code in Arduino UNO, construct the circuit using following connection diagram and then test the results.
int buzzer = 11;
int irs = 7;

void setup()
{
  pinMode(buzzer,OUTPUT);
  pinMode(irs,INPUT);
}

void loop()
{
  if(digitalRead(irs)==LOW)
  {
    digitalWrite(buzzer,HIGH);
  }
  else
    digitalWrite(buzzer,LOW);
}
Procedure & Precautions
- First type the code correctly in Arduino IDE software.
- Then connect the Arduino board to computer through data cable and click on “Tools” menu.
- Then select “Arduino board” and respective “COM” Port.
- The upload the code in Arduino UNO board.
- Once the circuit started, place your palm in front of the IR sensor.
- Immediately the buzzer will be ON.
- Now remove your palm, in front of the IR Sensor.
- The buzzer will be OFF.
- Remember that the range of IR sensor is short. So place your palm or any object near the sensor.
Circuit Diagram
Subscribe
Login
1 Comment
Oldest


