The standardized measurement of TDS of any drinking water can be done with the help of simple technique of measuring the electrical conductivity of water, without polarizing the water molecules.
We know that the larger is the salinity of water the more is its electrical conductivity. So by using standard techniques of measuring the electrical conductivity (Ec) we can use this value to find out the TDS by using following empirical equation.


Methodology to Measure Electrical Conductivity
Soil and water salinity is often measured by electrical conductivity (Ec).
The most commonly used EC units are deciSiemens per metre (dS/m) and millimho per centimetre (℧/cm), numerically:
1dS/m = 1m℧/cm
Simple relationships are used to convert EC to TDS, or vice Versa:
TDS (mg/L or ppm) = Ec (dS/m) x 640 (Ec from 0.1 to 5 dS/m)
TDS (mg/L or ppm) = EC (dS/m) x 800 (Ec > 5 dS/m)
The ratio of TDS to Ec of various salt solutions ranges from 550 to 700 ppm per dS/m, depending on the compositions of the solutes in the water. For soil extracts in the EC range from 3 to 30 dS/m, TDS can be estimated using the formula: TSS (mmol/L) = Ec (dS/m) x 10
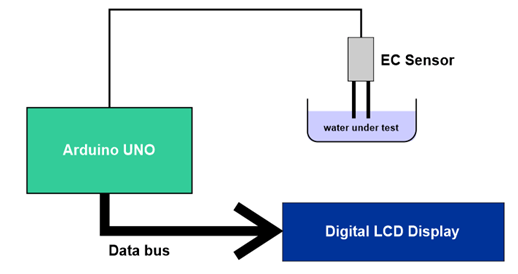
Block Diagram
Keywords
Salinity, TDS, electrical conductivity, Siemens, mho conductivity unit, mol, ppm
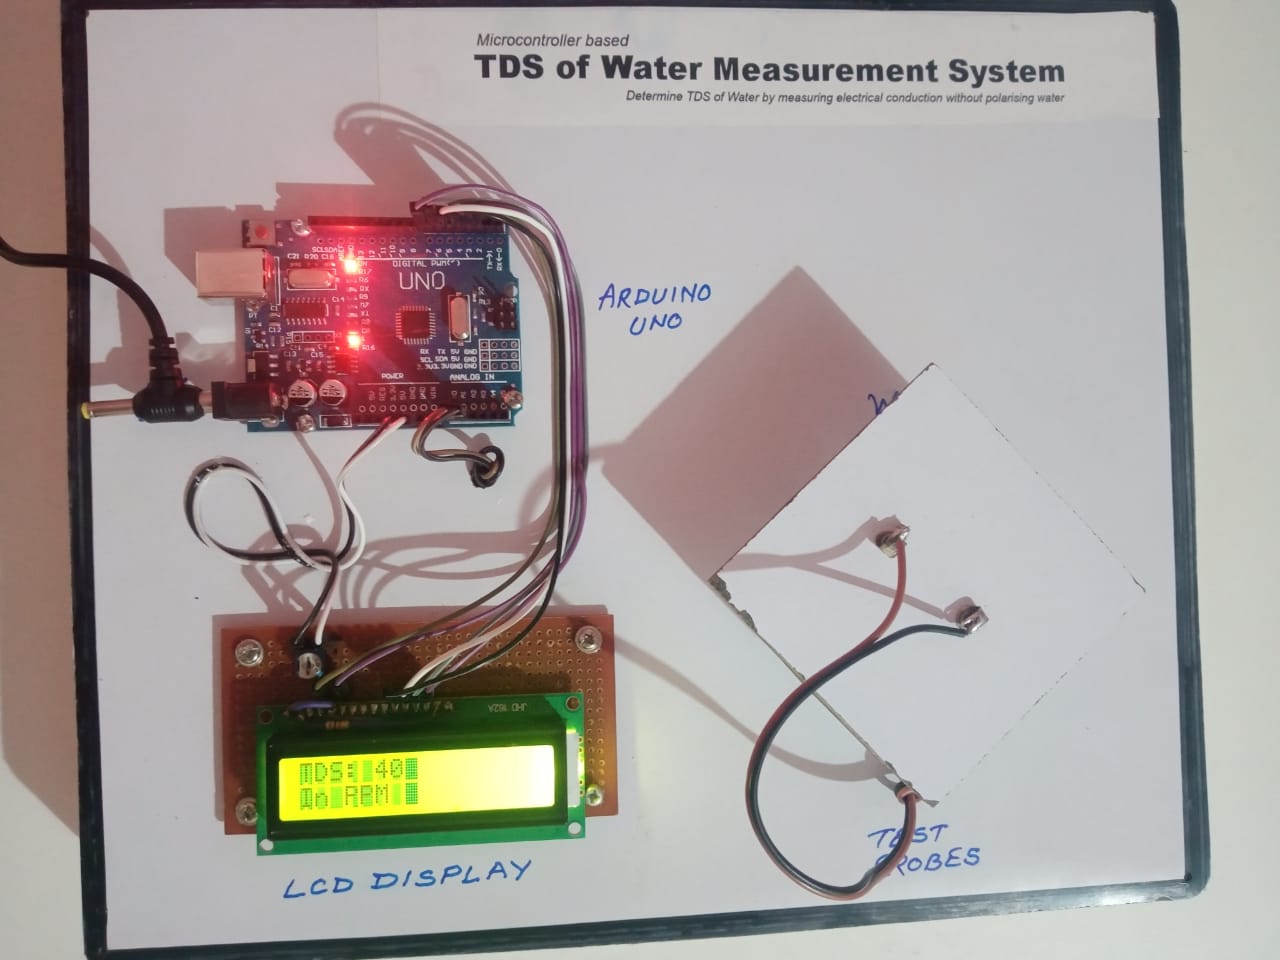
Details of Project Working
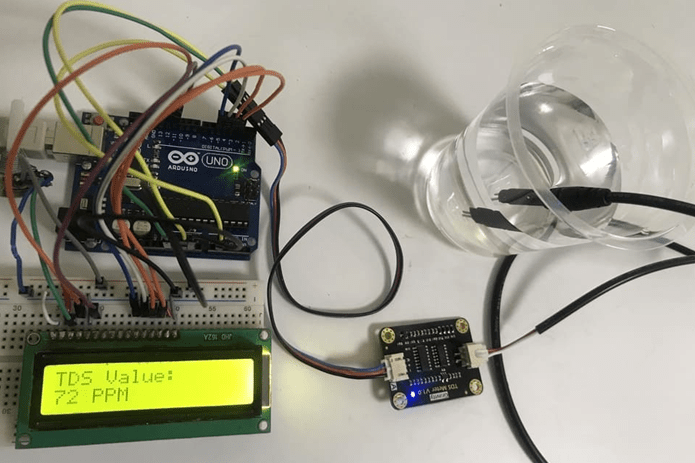
The project works on the test measurement of electrical conductivity of water under test. For that two probes are given which we have to dip in water under test.
The code of the project is written in such a way that it first takes the readings of electrical conductivity of water at a rate of 1 second. Then these values are processed by using the empirical equation as explained above and then displays the value of TDS in PPM (Parts Per Million).
Here remember that the electrical conductivity and electrical resistivity of any medium is inversely proportional to each other. Resistance of a medium is measured in the unit Ohm (Ω) while the conductance of the medium is measured in Mho ( ).
Thus if the electrical resistance of a medium is more then its conductivity will be less and vice versa.
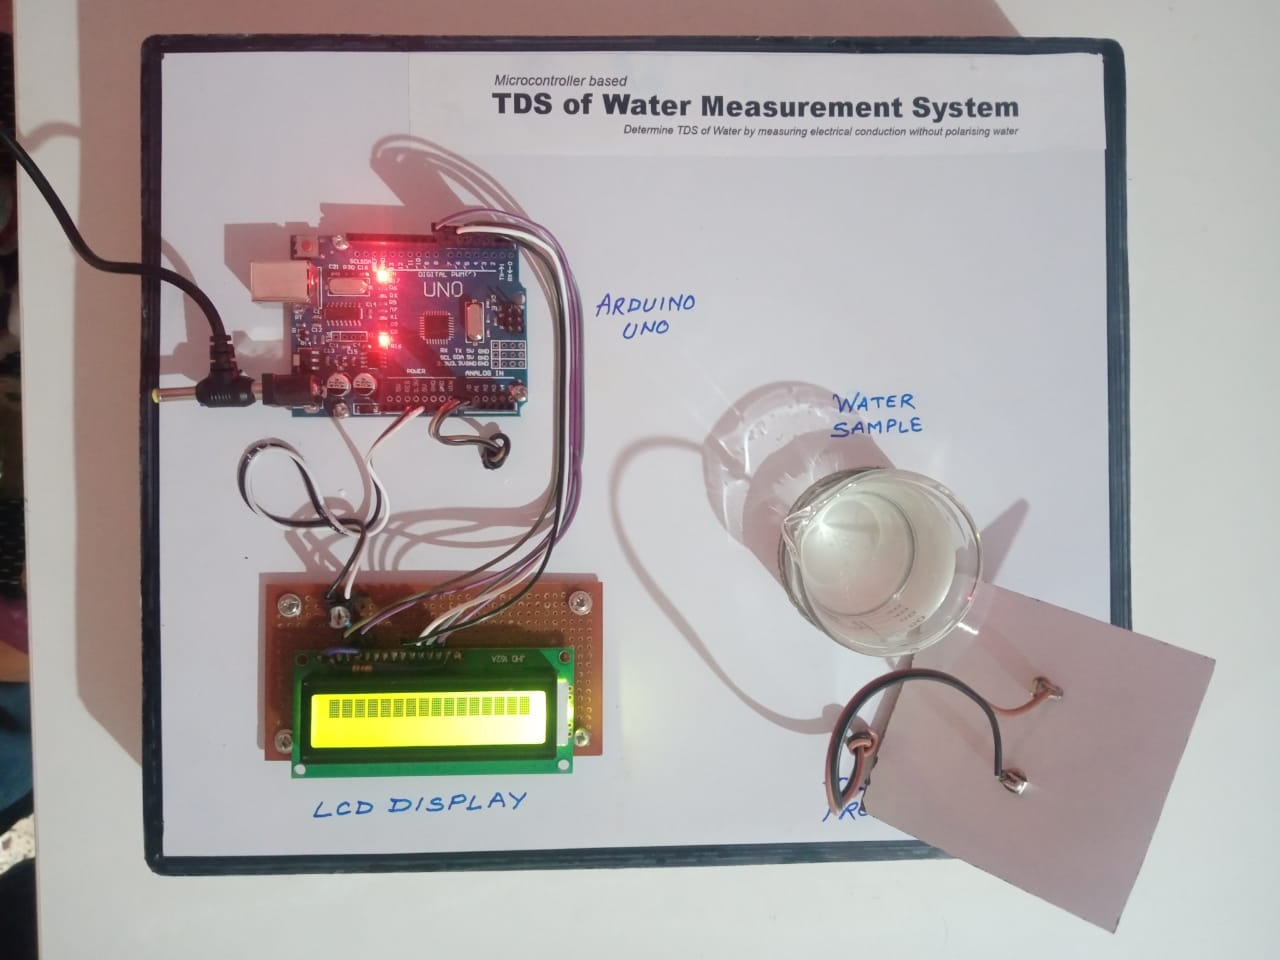
Procedure for Testing
- First pour the water to test in the given beaker.
- Dip the testing probes into the water such that at least ¼ part of the probes will be dipped into water.
- Now connect power supply to the Arduino by using 12V 1A DC adapter.
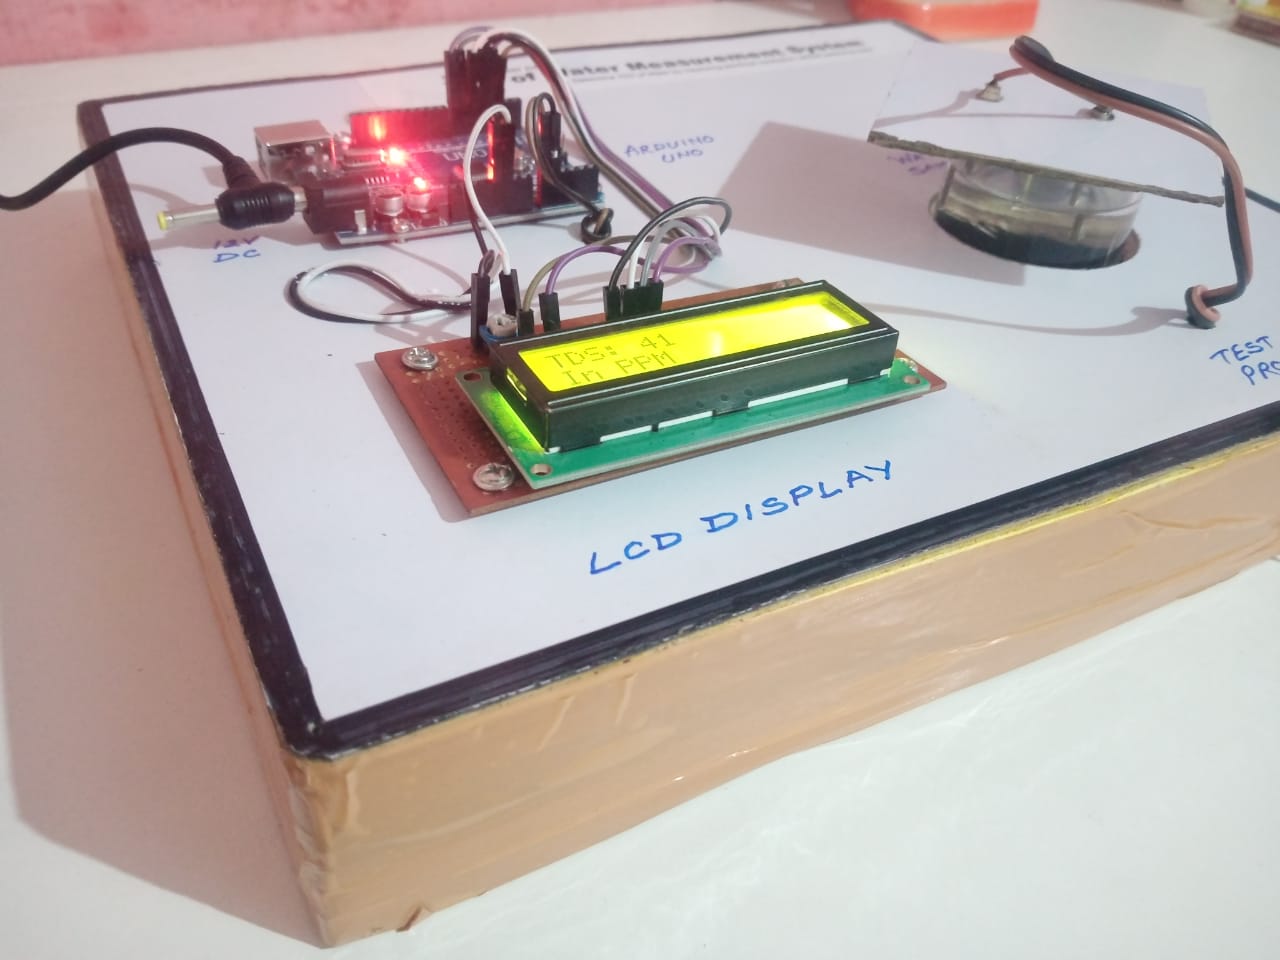
- The LCD display will glow to show initial value.
- Now the value of TDS of water will be displayed on the LCD display.
- Wait for at least 10 seconds to get correct reading.
- After 10 seconds note down the immediately displayed reading.
- This reading is the correct reading of the TDS value of the water under test.
- Now remove the water sample and pour new sample with some dissolved salts in it.
- Repeat the procedure again to note down the TDS of water.
- You will notice that the salty water has more TDS value than fresh water or filtered water.
Details of Arduino UNO
Arduino UNO is a simple microcontroller development board which can be programmed with easy coding techniques. I learnt only the basics of coding with concepts of variables, datatypes and functions like void setup() and void loop().
Specifications of Arduino UNO Development Board
- Arduino is an open source platform for robotics. Website link: https://arduino.cc
- Special Arduino programming language
- Simplified form of C/C++ language
- Easy connections to make any circuit
- Easy interface of sensors with Arduino
Internal Structure of Arduino UNO
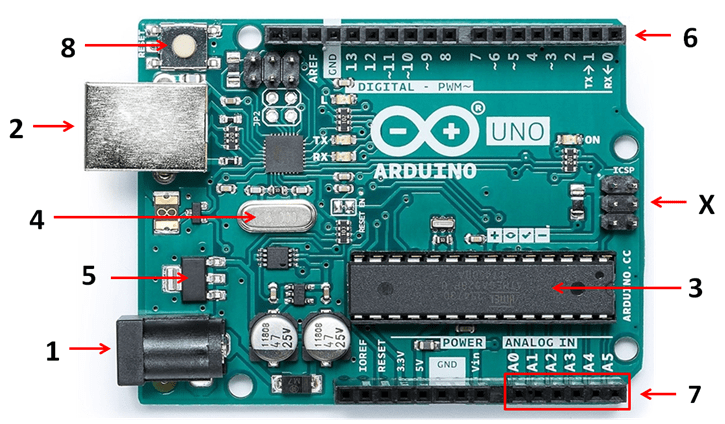
Connection Details
- 7-12V DC supply
- USB-B socket (connect data cable)
- ATMega328p microcontroller
- 16MHz crystal
- 5V regulator
- digital pins (14 pins)
- analog pins (6 pins)
- RESET switch (to reset the Arduino UNO and start the code from the beginning)
Details of LCD Display
The display used in this project is a 16 X 2 type LCD (Liquid Crystal Display) Display. It is interfaced with Arduino to receive the processed data and display it on the screen in typical characters.
Pinout of LCD Display
There are 16 pins in this display with two rows to show the messages on its screen. In our project we are using D4 to D7 as Data Bus interfaced with Arduino.

Connection Diagram

The Code
We are still working on this code. Stay tuned to receive automatic updates from our server…! WE NEVER SPAM………………..!
#include <LiquidCrystal.h>
int rs=2,en=3,d4=4,d5=5,d6=6,d7=7;
LiquidCrystal lcd(rs,en,d4,d5,d6,d7);

// User Defined Variables
int R1= 1000;
int Ra=25; //Resistance of powering Pins
int ECPin = A0;
int ECGround = A1;
int ECPower = A4;

// Converting to ppm [Learn to use EC it is much better
// Hana [USA] PPMconverion: 0.5
// Eutech [EU] PPMconversion: 0.64
// Tranchen [Australia]  PPMconversion: 0.7

float PPMconversion=0.64;

// Cell Constant For Ec Measurements

float K=2.9;

// Temp Probe Related
// #define ONE_WIRE_BUS 10 // Data wire For Temp Probe is plugged into pin 10 on the Arduino
// const int TempProbePossitive =8; //Temp Probe power connected to pin 9
// const int TempProbeNegative=9; //Temp Probe Negative connected to pin 8

// END Of Recomended User Inputs

float EC=0;
float EC25 =0;
int   ppm =0;

float raw= 0;
float Vin= 5;
float Vdrop= 0;
float Rc= 0;
float buffer=0;

// Setup - runs Once and sets pins etc
void setup()
{
     lcd.begin(16,2);
     lcd.clear(); // clears previous message on the display
     delay(2000);

    pinMode(ECPin,INPUT);
    pinMode(ECPower,OUTPUT);//Setting pin for sourcing current
    pinMode(ECGround,OUTPUT);//setting pin for sinking current
    digitalWrite(ECGround,LOW);//We can leave the ground connected permanantly

    delay(100);

    // Adding Digital Pin Resistance to [25 ohm] to the static Resistor

    R1=(R1+Ra);// Taking into acount Powering Pin Resitance
}

void loop()
{
    GetEC(); //Calls Code to Go into GetEC() Loop [Below Main Loop]
             // dont call this more that 1/5 hhz [once every five seconds]
             // or you will polarise the water
    PrintReadings(); // Cals Print routine [below main loop]
    delay(5000);
}

// To run this code we have to use the user defined functions.
// Contact us to get the complete code.
Procedure for Testing
- First pour the water to test in the given beaker.
- Dip the testing probes into the water such that at least ¼ part of the probes will be dipped into water.
- Now connect power supply to the Arduino by using 12V 1A DC adapter.
- The LCD display will glow to show initial value.
- Now the value of TDS of water will be displayed on the LCD display.
- Wait for at least 10 seconds to get correct reading.
- After 10 seconds note down the immediately displayed reading.
- This reading is the correct reading of the TDS value of the water under test.
- Now remove the water sample and pour new sample with some dissolved salts in it.
- Repeat the procedure again to note down the TDS of water.
- You will notice that the salty water has more TDS value than fresh water or filtered water.
Contact Us
Get the complete details of this project just for Rs.1000. You will get –
Error free connection diagram, working code, mathematical analysis of equations, project report in MS Word file, construction photos, readymade slideshow and online guidance, from our expert faculty, for making the project successful at your end.
Click here to contact us!