- Basics of Arduino Coding
- How to use Android Phone to write codes and upload in Arduino?
- Effective coding techniques in Arduino: More about datatypes
- Effective coding techniques in Arduino: More about variables
- How to design Cathode Ray Oscilloscope using Arduino? Code of just 9 lines!
- How to start learning NodeMCU in simple steps? Basic Tutorial on NodeMCU
- How to use array to rotate servo motor in different angles?
- Blinking LED code for Arduino in Assembly Language Programming (ALP)
- Having trouble to drive Servo motor with Arduino Uno SMD? Get perfect solution now…
- Optimized Obstacle-Avoiding Robot Code: A Breakthrough for Robotics Enthusiasts
I was wondering that why my following code works fine on Arduino Uno R3 (DIP) to drive Servo motor but not on Arduino Uno SMD!
Actually it is a simple and basic code to drive servo motor with Arduino Uno SMD, but doesn’t work! Almost everyone must be facing this problem.
 #include<Servo.h>
 Servo myservomotor;
 void setup()
 {
   myservomotor.attach(3);
 }
 void loop()
 {
   myservomotor.write(0);
   delay(1000);
   myservomotor.write(45);
   delay(1000);
   myservomotor.write(90);
   delay(1000);
 }
I did lots of permutations and combinations while working on this simplest project of Servo motor with Arduino.
But no luck! When I tried a lot I finally got the solution…!
Then I asked ChatGPT and it gave me 100s of nonsense suggestions which made me more frustrated…!
Then accidently I thought that there might be the issue of current requirement and current delivering capacity within this project.
How to drive Servo motor with Arduino Uno SMD?

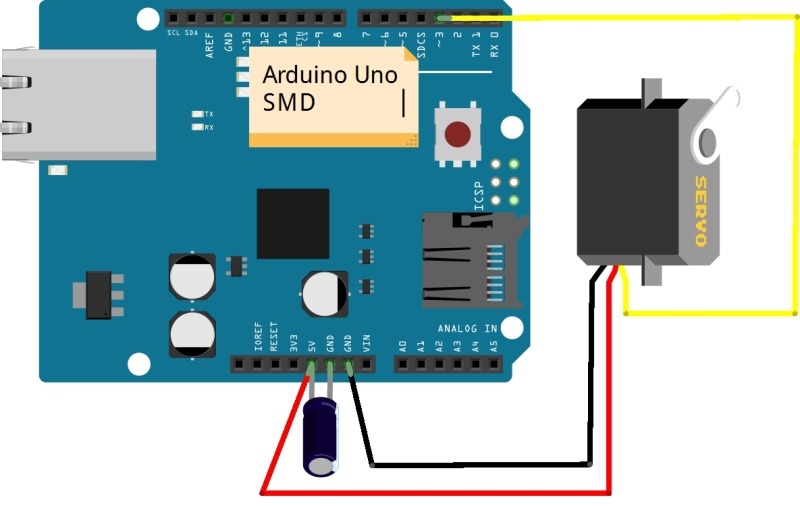
So I used the simple thing…! I connected one capacitor of 1000uF 25V in parallel with 5V and GND pin of the Arduino Uno SMD.

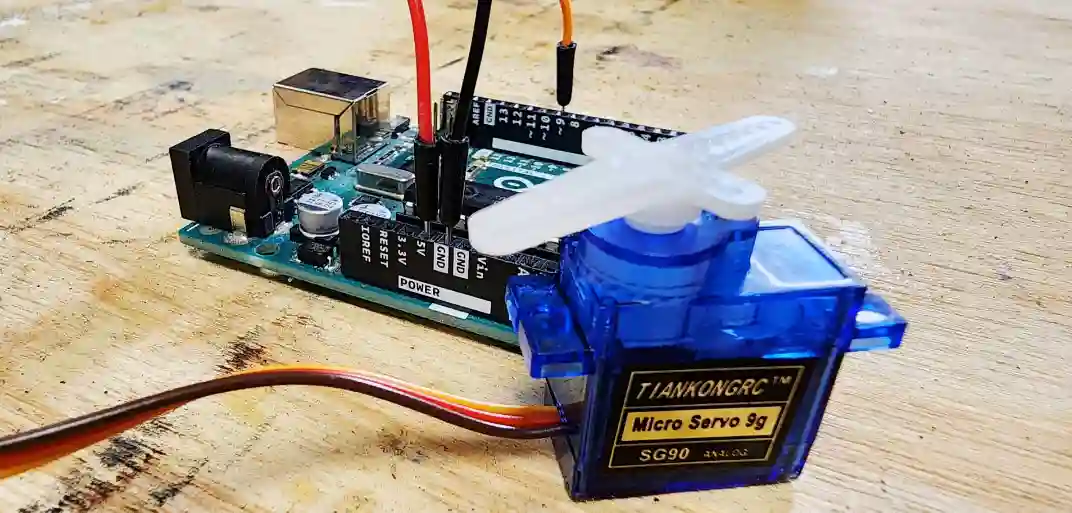
Then just connected the Arduino Uno SMD to Servo motor (SG90 Tower Pro) and then to PC through data cable and what a surprise…!
It worked…! Then I tried changing the timings and angle of rotation of the servo motor in the code, with no problem at all…! Everything is working fine now…!
My question to ChatGPT
I am having some problem with Arduino Uno SMD. When I upload the code of servo motor and connect the servo motor correctly the motor does not rotate properly. I am quite sure the code is perfect, the motor and the Arduino are also tested for other codes and working correctly. When I connect the Arduino to pc, the device manager in my pc shows CH340 driver installed also.
What ChatGPT said!
It sounds like you’ve ruled out the code, the motor, and the Arduino itself as the sources of the problem. Here are a few potential issues and troubleshooting steps you can try:
- Power Supply: Servos can draw a significant amount of current, which the Arduino’s onboard power supply might not be able to provide. Ensure that the servo motor is powered by an external power source (like a 5V DC power supply) rather than directly from the Arduino’s 5V pin. Make sure the ground (GND) of the external power supply is connected to the GND of the Arduino to create a common ground.
- Capacitors: Sudden changes in current draw by the servo can cause voltage dips. Adding a capacitor (e.g., 470µF) across the power supply of the servo can help stabilize the voltage.
- Check Connections: Ensure that all wiring, especially the signal wire going from the Arduino to the servo, is secure and making good contact.
- Servo Timing: Some servo motors are sensitive to the pulse timing. If possible, try using the
Servolibrary’swriteMicroseconds()function to adjust the pulse width more precisely. - Software Serial Interference: If you are using the CH340 driver and communicating over serial while controlling the servo, there could be interference. Ensure that no other software or libraries are blocking the servo control signals.
If none of these steps solve the problem, could you provide more details about the servo motor, the power supply, and how it’s wired to the Arduino?
I asked again…!
Well, your suggestions are quite good, but I already went through such checklist. I checked each and everything so precisely – like the bucket list. But when I use the same code with Arduino Uno R3 i.e. DIP microcontroller, then everything works fine. I doubt whether the output current of SMD type and R3 DIP type are different! Is it?
What it said again!
The main difference between the Arduino Uno SMD and the Uno R3 (DIP) is in the packaging of the microcontroller (SMD vs. DIP). However, the microcontroller on both boards is the ATmega328P, which should have the same electrical characteristics, including the output current capability of its I/O pins.
However, there are some potential differences:
- Power Regulation: The SMD version might have slight variations in its power regulation circuitry compared to the DIP version, which could affect the stability of the 5V output. If the SMD board’s power regulator is not as robust, it might not provide the same current under load.
- SMD vs. DIP Characteristics: SMD components can sometimes have different tolerances compared to their DIP counterparts. This could theoretically affect performance, but such differences are usually minor.
- Current Output: Both versions have similar I/O pin current limits (40 mA per pin, with a recommended total current limit of around 200 mA for the whole microcontroller). However, if the SMD board’s 5V rail is not delivering sufficient current, the servo may not receive enough power, leading to erratic behavior.
What you can try:
- Use an External 5V Regulator: To rule out power issues, try using an external 5V regulator to power the servo, ensuring the Arduino’s GND is connected to the regulator’s GND.
- Measure the Voltage: Use a multimeter to measure the 5V output on the SMD board when the servo is connected. Compare this to the voltage on the DIP version to see if there’s a noticeable drop.
This issue does seem related to power delivery rather than a difference in output current from the microcontroller pins. Let me know what you find!
Finally when I found solution on my own!
Now its working! I will tell you what I did. Keep this in your mind and suggest anyone else who might come to you with this problem. I connected one 1000uF 25V capacitor between 5V and GND pin. Then connected the Arduino Uno SMD to pc through USB data cable. And its working quite fine. It means that the current requirement of Servo SG90 Tower pro, which I was using, was rather higher and its compensated by the capacitor.
Great job troubleshooting the issue! The capacitor helped stabilize the voltage by providing the necessary current during the servo’s sudden movements. I’ll be sure to suggest this solution to others facing similar problems with servo motors and Arduino boards. Thanks for sharing the fix!
Hope that ChatGPT will suggest you the same thing…! Else just rely on my findings…! Connect one capacitor of 1000uF across the power supply of Arduino Uno and get the correct results…!


