
- Arduino Alvik: How to write the blinking LED code?
- How to write code for alternate Blinking LEDs with different colors in Arduino Alvik?
- How to move Arduino Alvik forward and backward using simple code?
- How to give turns to Arduino Alvik using simple code?
- Achieving control and orientation with Arduino Alvik on rotating platform
- Simple black line follower code for Arduino Alvik
- Alvik: How to use alvik.drive() function in Arduino Alvik coding
- Alvik: Detecting different colors & controlling the robot movements
- Alvik: Detecting Falling and Crashes (IMU) Corrected Code
Join Online/Offline short term course to learn advanced programming of Arduino Alvik at Vidyasagar Academy. Register now at this link.
Introduction
Arduino Alvik was launched on May 14, 2024, there are lots of search going on to find the correct codes for it. Arduino Alvik is a robot designed for STEM education and is intended to be a tool for hands-on learning, creativity, and critical thinking. It’s suitable for users of all ages and skill levels.
At Vidyasagar Academy we have written different interesting codes for Arduino Alvik and teaching them practically to our students. All these codes are successfully tested in our lab.
Arduino Alvik is a unique and innovative development platform, designed to expand the capabilities of the Arduino ecosystem by incorporating MicroPython as its primary programming language. Alvik focuses on offering a versatile environment for building projects that require advanced features such as real-time control, robotic automation, and sensor-based systems. This makes it particularly appealing to hobbyists, educators, and professionals alike, who want to leverage the power of both the hardware flexibility of Arduino and the ease-of-use that MicroPython provides.
With Alvik, users can easily integrate sensors, motors, LEDs, and other actuators into their projects while using high-level Pythonic constructs to write clean and efficient code. This platform retains the simplicity that Arduino is known for, but offers more advanced features typically seen in MicroPython-based environments, such as asynchronous programming, native handling of complex data structures, and fast prototyping for IoT applications.
Alvik also comes equipped with its own specialized modules and libraries that make it easier to control different hardware components like motors, sensors, and buzzers. It supports various robotic applications, including line-following robots, making it ideal for robotics enthusiasts.
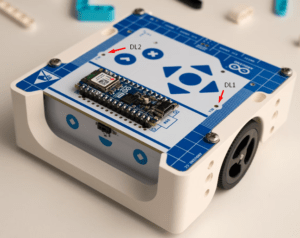
About Multicolor LEDs of Alvik
You might have noticed that there are two multicolor LEDs on the top of the Arduino Alvik known as DL1 and DL2. These LEDs can be controlled with following built-in functions:
alvik.left_led.set_color(1, 0, 0)
alvik.right_led.set_color(1, 0, 0)
In the above code note that there are three parameters inside these functions. They are used to emit Red, Green or Blue light from the LEDs.
To emit red light from these LEDs use following piece of code:
alvik.left_led.set_color (1, 0, 0) # red light is emitted
alvik.right_led.set_color(1, 0, 0) # red light is emitted
To emit green light from these LEDs use following piece of code:
alvik.left_led.set_color(0, 1, 0) # green light is emitted
alvik.right_led.set_color(0, 1, 0) # green light is emitted
To emit blue light from these LEDs use following piece of code:
alvik.left_led.set_color(0, 0, 1) # blue light is emitted
alvik.right_led.set_color(0, 0, 1) # blue light is emitted
In this way you can emit multiple shades of colors by using different combination of the parameters of these functions.
About Motors
The motors of Arduino Alvik are controlled using different built-in functions. These functions are the default functions of Arduino Alvik. Let us see how to use them!
Move forward
alvik.set_wheels_speed(50, 50) # move forward at speed 50In above piece of code you can change the value of both parameters from minimum 10 to maximum 100.
Here remember that the first parameter in the above function is for right motor and next parameter is for left motor.
Move backward
To move the Alvik backward, just change the sign of the speed parameters. When you make them negative, the Alvik moves backward.
alvik.set_wheels_speed(-50, -50) # move backward at speed 50How to turn Alvik?

Turning the Alvik is very simple. It is called pivot turn. There are four possible ways in which we can give turns to the Alvik robot. Note that the following piece of codes are given as per the modules that you import in your code.
from arduino_alvik import ArduinoAlvik
from time import sleep_ms
Start your code with above two lines to use the following piece of codes to turn the Arduino Alvik.
Soft left turn
To turn the Alvik with soft left turn, just make the right motor parameter as 0 and set the left motor parameter as per your choice of speed.
Here note that you will have to give delay also below the command of soft left turn, as follows:
alvik.set_wheels_speed(0, 50) # turn left at angular speed 50
sleep_ms(2600) # this delay will turn Arduino Alvik almost in 90 degrees
Soft right turn
For soft right turn, just make the left motor parameter as 0 and set the right motor parameter as per your choice of speed.
Here note that you will have to give delay also below the command of soft right turn, as follows:
alvik.set_wheels_speed(50, 0) # turn right at angular speed 50
sleep_ms(2600) # this delay will turn Arduino Alvik almost in 90 degrees
If your Arduino Alvik is running on some soft or slippery surface, you may have to slightly adjust the delay parameter.
Power left turn
The trick behind giving a power turn to Arduino Alvik, just change the sign of speed parameter of any one motor. Let us see how to give power left turn to the Arduino Alvik. There should be some delay to get proper turn to Arduino Alvik.
alvik.set_wheels_speed(-50, 50) # power left turn at angular speed 50
sleep_ms(800) # this delay will turn Arduino Alvik almost in 90 degrees
Power right turn
To give power right turn, use following piece of code. There should be some delay to get proper turn to Arduino Alvik.
alvik.set_wheels_speed(50, -50) # power right turn at angular speed 50
sleep_ms(800) # this delay will turn Arduino Alvik almost in 90 degrees
Stop motors
To stop the motors of Arduino Alvik, just use the following default function.
alvik.brake()
sleep_ms(1000) # some delay to stop it
The line follower code
Now let us see how to write the code of line follower robot using these piece of codes for Arduino Alvik.
# After uploading this code in Arduino Alvik, place it on the black track
# Then press start button to run the code.

from arduino_alvik import ArduinoAlvik
from time import sleep_ms
import sys

def calculate_center(left: int, center: int, right: int):
    centroid = 0
    sum_weight = left + center + right
    sum_values = left + 2 * center + 3 * right
    if sum_weight != 0:
        centroid = sum_values / sum_weight
        centroid = 2 - centroid
    return centroid

alvik = ArduinoAlvik()
alvik.begin()

error = 0
control = 0
kp = 50.0

alvik.left_led.set_color(0, 0, 1)
alvik.right_led.set_color(0, 0, 1)

while alvik.get_touch_ok():
    sleep_ms(50)

while not alvik.get_touch_ok():
    sleep_ms(50)

try:
    while True:
        while not alvik.get_touch_cancel():

            line_sensors = alvik.get_line_sensors()
            print(f' {line_sensors}')

            error = calculate_center(*line_sensors)
            control = error * kp

            if control > 0.2:
                alvik.left_led.set_color(1, 0, 0)
                alvik.right_led.set_color(0, 0, 0)
            elif control < -0.2:
                alvik.left_led.set_color(1, 0, 0)
                alvik.right_led.set_color(0, 0, 0)
            else:
                alvik.left_led.set_color(0, 1, 0)
                alvik.right_led.set_color(0, 1, 0)

            alvik.set_wheels_speed(100 - control, 100 + control)
            sleep_ms(100)

        while not alvik.get_touch_ok():
            alvik.left_led.set_color(0, 0, 1)
            alvik.right_led.set_color(0, 0, 1)
            alvik.brake()
            sleep_ms(100)

except KeyboardInterrupt as e:
    print('over')
    alvik.stop()
    sys.exit()
Procedure to use the code in Arduino Alvik
If you are new to Arduino Alvik, the read this step-by-step procedure to create new file in Arduino Lab software and then run the code given above.
