- Arduino Alvik: How to write the blinking LED code?
- How to write code for alternate Blinking LEDs with different colors in Arduino Alvik?
- How to move Arduino Alvik forward and backward using simple code?
- How to give turns to Arduino Alvik using simple code?
- Achieving control and orientation with Arduino Alvik on rotating platform
- Simple black line follower code for Arduino Alvik
- Alvik: How to use alvik.drive() function in Arduino Alvik coding
- Alvik: Detecting different colors & controlling the robot movements
- Alvik: Detecting Falling and Crashes (IMU) Corrected Code
Join Online/Offline short term course to learn advanced programming of Arduino Alvik at Vidyasagar Academy. Register now at this link.
If you are already familiar with Arduino Alvik environment, then you can proceed with the following post. However, if you are new to Arduino Alvik, then we suggest you to read this post on Arduino Alvik basics first!
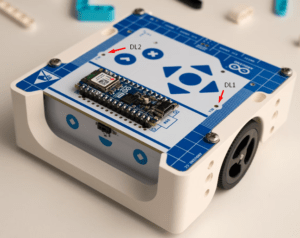
As we know there are two on board multicolor LEDs on top of the Arduino Alvik. Let us see the following code to blink these LEDs alternately by changing their color.

The Code
The following code is freely available for logged in users.
from arduino_alvik import ArduinoAlvik
from time import sleep_ms

# Initialize the Alvik robot
alvik = ArduinoAlvik()
alvik.begin()

# Make the two LEDs off initially
alvik.left_led.set_color(0, 0, 0)
alvik.right_led.set_color(0, 0, 0)

while (True):
  # Blink the two LEDs in Red for 5 times
  for _ in range(5):
      alvik.left_led.set_color(1, 0, 0)  # Turn on LEDs (Red)
      alvik.right_led.set_color(1, 0, 0)
      sleep_ms(500)  # Wait for 500 ms
      alvik.left_led.set_color(0, 0, 0)  # Turn off LEDs
      alvik.right_led.set_color(0, 0, 0)
      sleep_ms(500)  # Wait for 500 ms
  sleep_ms(1000)

  # Blink the two LEDs in Green for 5 times
  for _ in range(5):
      alvik.left_led.set_color(0, 1, 0)  # Turn on LEDs (Red)
      alvik.right_led.set_color(0, 1, 0)
      sleep_ms(500)  # Wait for 500 ms
      alvik.left_led.set_color(0, 0, 0)  # Turn off LEDs
      alvik.right_led.set_color(0, 0, 0)
      sleep_ms(500)  # Wait for 500 ms
  sleep_ms(1000)

  # Blink the two LEDs in Blue for 5 times
  for _ in range(5):
      alvik.left_led.set_color(0, 0, 1)  # Turn on LEDs (Red)
      alvik.right_led.set_color(0, 0, 1)
      sleep_ms(500)  # Wait for 500 ms
      alvik.left_led.set_color(0, 0, 0)  # Turn off LEDs
      alvik.right_led.set_color(0, 0, 0)
      sleep_ms(500)  # Wait for 500 ms
  sleep_ms(1000)
Procedure to use the code in Arduino Alvik
If you are new to Arduino Alvik, the read this step-by-step procedure to create new file in Arduino Lab software and then run the code given above.


