- Arduino Alvik: How to write the blinking LED code?
- How to write code for alternate Blinking LEDs with different colors in Arduino Alvik?
- How to move Arduino Alvik forward and backward using simple code?
- How to give turns to Arduino Alvik using simple code?
- Achieving control and orientation with Arduino Alvik on rotating platform
- Simple black line follower code for Arduino Alvik
- Alvik: How to use alvik.drive() function in Arduino Alvik coding
- Alvik: Detecting different colors & controlling the robot movements
- Alvik: Detecting Falling and Crashes (IMU) Corrected Code
Join Online/Offline short term course to learn advanced programming of Arduino Alvik at Vidyasagar Academy. Register now at this link.
If you are already familiar with Arduino Alvik environment, then you can proceed with the following post. However, if you are new to Arduino Alvik, then we suggest you to read this post on Arduino Alvik basics first!
As we know there are two motors on the bottom of the Arduino Alvik. Let us see how to control these motors and move the robot in different directions.

How to turn Alvik?

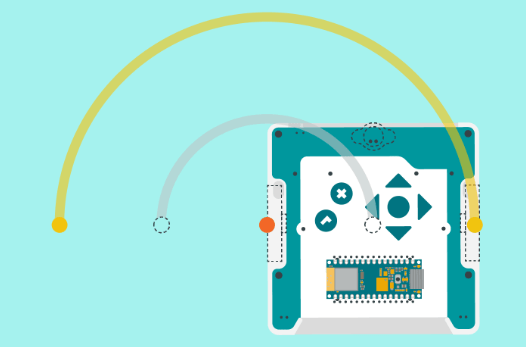
Turning the Alvik is very simple. It is called pivot turn. There are four possible ways in which we can give turns to the Alvik robot. Note that the following piece of codes are given as per the modules that you import in your code.
from arduino_alvik import ArduinoAlvik
from time import sleep_ms
Start your code with above two lines to use the following piece of codes to turn the Arduino Alvik.
Soft left turn
To turn the Alvik with soft left turn, just make the right motor parameter as 0 and set the left motor parameter as per your choice of speed.
Here note that you will have to give delay also below the command of soft left turn, as follows:
alvik.set_wheels_speed(0, 50) # turn left at angular speed 50
sleep_ms(2600) # this delay will turn Arduino Alvik almost in 90 degrees
Soft right turn
For soft right turn, just make the left motor parameter as 0 and set the right motor parameter as per your choice of speed.
Here note that you will have to give delay also below the command of soft right turn, as follows:
alvik.set_wheels_speed(50, 0) # turn right at angular speed 50
sleep_ms(2600) # this delay will turn Arduino Alvik almost in 90 degrees
If your Arduino Alvik is running on some soft or slippery surface, you may have to slightly adjust the delay parameter.
Power left turn
The trick behind giving a power turn to Arduino Alvik, just change the sign of speed parameter of any one motor. Let us see how to give power left turn to the Arduino Alvik. There should be some delay to get proper turn to Arduino Alvik.
alvik.set_wheels_speed(-50, 50) # power left turn at angular speed 50
sleep_ms(800) # this delay will turn Arduino Alvik almost in 90 degrees
Power right turn
To give power right turn, use following piece of code. There should be some delay to get proper turn to Arduino Alvik.
alvik.set_wheels_speed(50, -50) # power right turn at angular speed 50
sleep_ms(800) # this delay will turn Arduino Alvik almost in 90 degrees
Stop motors
To stop the motors of Arduino Alvik, just use the following default function.
alvik.brake()
sleep_ms(1000) # some delay to stop it
The Code
The following code is freely available for logged in users.
from arduino_alvik import ArduinoAlvik
from time import sleep_ms

# Initialize the Alvik robot
alvik = ArduinoAlvik()
alvik.begin()

while True:
  # Move forward
  alvik.set_wheels_speed(50, 50)  # forward
  sleep_ms(1000)  # Move forward for 1 second

  # Stop for 1 second
  alvik.brake() # note this special function
  sleep_ms(1000)  # stop for 1 second

  # Turn left
  alvik.set_wheels_speed(0, 50)  # Turn left
  sleep_ms(800)  # Turn left for 800ms

  # Stop for 1 second
  alvik.brake() # note this special function
  sleep_ms(1000)  # stop for 1 second

  # Move backward
  alvik.set_wheels_speed(-50, -50)  # Both motors backward at speed -50
  sleep_ms(1000)  # Move backward for 1 seconds

  # Stop for 1 second
  alvik.brake()
  sleep_ms(1000)  # stop for 1 second

  # Turn right
  alvik.set_wheels_speed(50, 0)  # Turn right
  sleep_ms(800)  # Turn right for 800ms

  # Stop for 1 second
  alvik.brake()
  sleep_ms(1000)  # stop for 1 second
Procedure to use the code in Arduino Alvik
If you are new to Arduino Alvik, the read this step-by-step procedure to create new file in Arduino Lab software and then run the code given above.


