This is complete comprehensive overview of Arduino for beginners written by our expert faculty, who has been teaching Arduino Robotics and its coding applications with detailed practical online and offline since the launching of Arduino itself. So you can consider this article as Arduino bible, itself. If you still have anything else to ask, to our expert faculties, please write comment at the bottom of this article. Stay tuned and subscribe to get part-2 of this article.
– Admin, Vidyasagar Academy
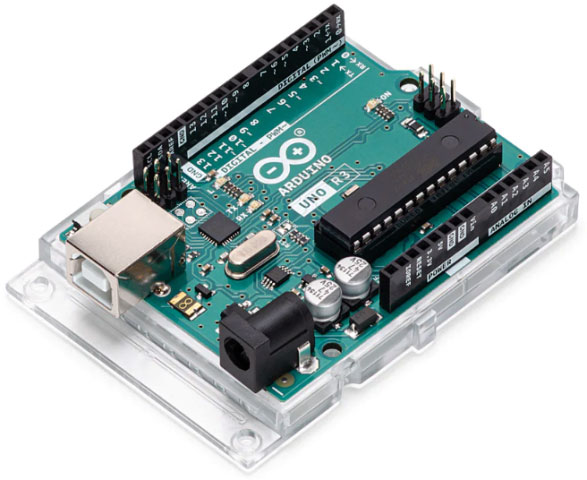
Arduino is an open-source electronics platform based on easy-to-use hardware and software. It has revolutionized the world of electronics, making it accessible to everyone from hobbyists to professionals. Its simplicity allows beginners to quickly start creating interactive projects, while its flexibility and powerful ecosystem cater to more advanced users looking to develop sophisticated applications.
1. Applications of Arduino
Arduino’s versatility makes it ideal for a wide variety of applications, ranging from basic to highly complex systems. Some common fields where Arduino is widely used include:
- Education and Prototyping: Arduino boards are extensively used in schools and universities for teaching electronics and programming. The hands-on approach with simple hardware makes it easier for students to grasp theoretical concepts.
- Robotics: Due to its capability to control motors, servos, and sensors, Arduino is commonly used in robotics. Projects like autonomous cars, robotic arms, and drones are developed using Arduino boards.
- IoT (Internet of Things): Arduino is a popular platform for IoT projects, allowing you to connect sensors and actuators to the internet. You can create smart devices like automated lighting systems, smart homes, and environmental monitoring stations.
- Wearables: Arduino boards like the Lily pad can be embedded in wearable technology to measure health data, create interactive clothing, or implement gesture-based controls.
- Home Automation: With Arduino, users can automate home appliances such as lights, fans, air conditioners, and security systems, integrating sensors and actuators to create smart homes.
- Art and Design Installations: Many artists use Arduino in interactive installations, such as sound-reactive sculptures or light displays that respond to environmental changes.
- Agriculture: Arduino systems are employed to automate irrigation, monitor soil moisture, and control greenhouse environments, optimizing farming operations.
2. Arduino IDE: Detailed Use
The Arduino Integrated Development Environment (IDE) is the official software platform used to write and upload programs (referred to as sketches) onto an Arduino board.
Getting Started with Arduino IDE:
- Installation: You can download the Arduino IDE from the official Arduino website (https://www.arduino.cc/en/software) and install it on Windows, macOS, or Linux.
- Setting Up the IDE:
- Once installed, launch the IDE and connect your Arduino board to your computer using a USB cable.
- Select the board you’re using by navigating to Tools -> Board, and choose the appropriate board (e.g., Arduino Uno, Arduino Nano).
- Select the port to which your Arduino is connected by navigating to Tools -> Port, and choosing the appropriate COM or serial port.
Structure of the Arduino IDE:
- Menu Bar: Contains options for file management, editing, and tools for board/port selection and libraries.
- Sketch Area: The main area where you write your code.
- Output Area: Displays compilation and uploading messages.
- Console: Shows errors or messages related to the Arduino board’s communication.
- Verify Button: Verifies (compiles) the code to check for errors.
- Upload Button: Uploads the compiled code to the connected Arduino board.
Libraries in the IDE: Arduino has a rich library ecosystem. Libraries provide pre-written code that helps interface with sensors, actuators, and other hardware components. You can add libraries by navigating to Sketch -> Include Library -> Manage Libraries, where you can search for and install libraries for various modules.
3. Basics of Coding for Beginners
Arduino programs, or sketches, are written in a simplified version of C/C++. The language and environment are tailored for beginners, with pre-configured settings for accessing hardware components like sensors, LEDs, motors, and more.
Arduino Sketch Structure: Every Arduino sketch has two essential functions:
- setup():
- The setup() function runs once when the Arduino is powered on or reset. It’s used to initialize variables, pin modes, start using libraries, etc.
- Example:
void setup() {
  pinMode(13, OUTPUT);  // Set pin 13 as an output pin
}
- loop():
- The loop() function runs continuously after setup(). This is where the main logic of your program resides. Any code written inside loop() will execute repeatedly.
- Example:
void loop() {
  digitalWrite(13, HIGH);  // Turn on LED connected to pin 13
  delay(1000);             // Wait for 1 second
  digitalWrite(13, LOW);   // Turn off LED
  delay(1000);             // Wait for another second
}
Basics of Arduino Coding:
- Variables and Data Types: Just like in C/C++, Arduino uses variables to store data. Common data types include int, float, char, and boolean.
- Example:
int temperature = 25; // Declare an integer variable and assign a value
- Digital and Analog Pins: Arduino boards come with both digital and analog pins. These pins are used to interface with external hardware.
- Digital Pins: Used for on/off (high/low) operations like turning LEDs on or off.
- Analog Pins: Used to read continuous signals (e.g., from sensors like temperature or light sensors).
- Control Structures: Arduino supports basic control structures such as if, for, while, and switch statements to manage program flow.
- Example of if statement:
if (temperature > 30) {
  digitalWrite(fanPin, HIGH);  // Turn on the fan if temperature exceeds 30°C
}
- Functions: Functions are blocks of reusable code. You can define custom functions to organize your code better.
- Example:
void blinkLED() {
  digitalWrite(ledPin, HIGH);
  delay(500);
  digitalWrite(ledPin, LOW);
  delay(500);
}

void loop() {
  blinkLED();  // Call the blinkLED function in the loop
}
- Reading Inputs: To read digital inputs (e.g., buttons):
- Example:
int buttonState = digitalRead(buttonPin); // Read the state of the button
- To read analog inputs (e.g., sensors):
- Example:
int sensorValue = analogRead(sensorPin); // Read the sensor value
- Communication: Arduino boards can communicate with external devices via Serial, I2C, or SPI protocols. The most common is Serial communication:
- Example:
void setup() {
  Serial.begin(9600);  // Start serial communication at 9600 baud
}
void loop() {
  Serial.println("Hello, world!");  // Print a message to the Serial Monitor
  delay(1000);
}
4. Example Project: Blink an LED
Here’s a simple project for beginners to get started:
Components Needed:
- Arduino board (e.g., Arduino Uno)
- LED
- Resistor (220 ohm)
- Breadboard and jumper wires
Circuit:
- Connect the LED’s longer leg (positive, or anode) to pin 13 on the Arduino.
- Connect the shorter leg (negative, or cathode) to one leg of the resistor.
- Connect the other leg of the resistor to the GND pin of the Arduino.
Code:
void setup() {
  pinMode(13, OUTPUT);  // Set pin 13 as an output pin
}

void loop() {
  digitalWrite(13, HIGH);  // Turn on the LED
  delay(1000);             // Wait for 1 second
  digitalWrite(13, LOW);   // Turn off the LED
  delay(1000);             // Wait for 1 second
}
This project will make the LED blink at one-second intervals. By modifying the delay() values, you can control how fast or slow the LED blinks.
Conclusion:
Arduino is a powerful platform for learning, prototyping, and creating innovative projects. With an easy-to-use interface and a large community offering libraries, tutorials, and forums, it’s a great starting point for anyone interested in electronics and programming. By mastering the Arduino IDE and learning the basics of coding, beginners can open doors to limitless possibilities in robotics, automation, and the Internet of Things.
Getting inspired by reading this post?
You can join our complete practical oriented course on Arduino Robotics either online or offline and acquire command over Arduino or any microcontroller coding. Click this link to contact us for details.