- Arduino Alvik: How to write the blinking LED code?
- How to write code for alternate Blinking LEDs with different colors in Arduino Alvik?
- How to move Arduino Alvik forward and backward using simple code?
- How to give turns to Arduino Alvik using simple code?
- Achieving control and orientation with Arduino Alvik on rotating platform
- Simple black line follower code for Arduino Alvik
- Alvik: How to use alvik.drive() function in Arduino Alvik coding
- Alvik: Detecting different colors & controlling the robot movements
- Alvik: Detecting Falling and Crashes (IMU) Corrected Code
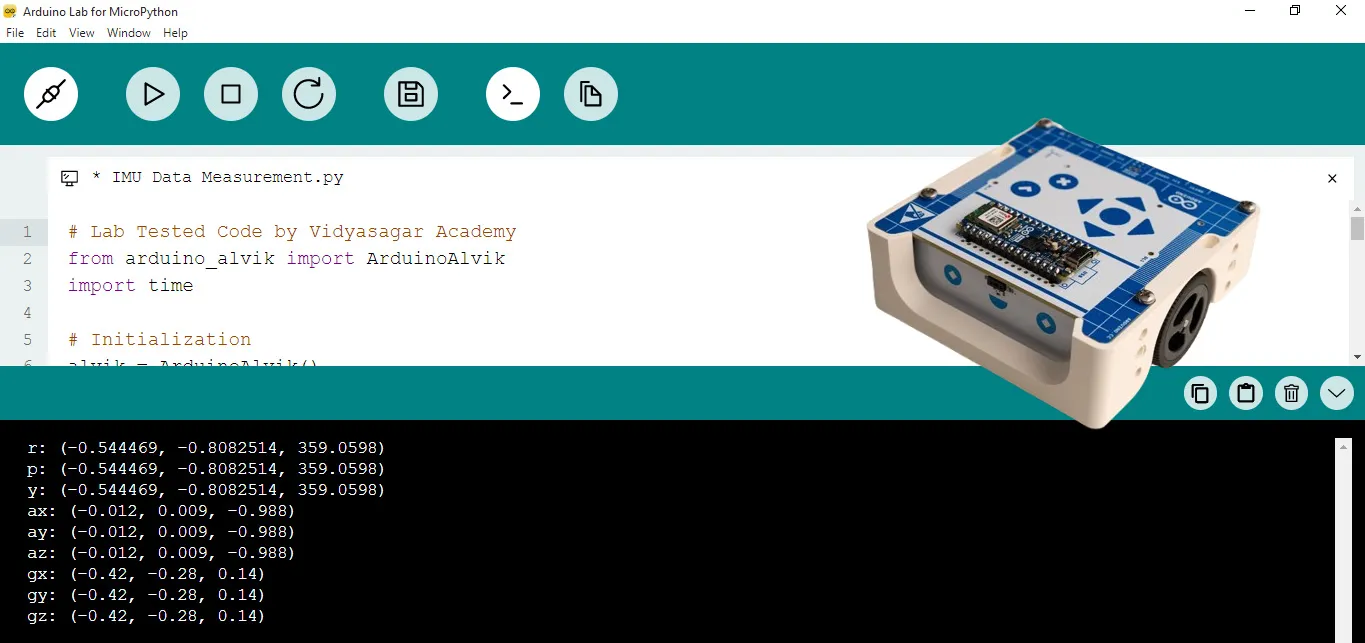
If you are Arduino Alvik lover, then you must have come up with the IMU part of programming with Alvik. As per the IMU code given on the official website of Arduino Alvik, I have spotted number of errors on their website.
IMU Code Problem
Particularly the errors associated with IMU (Inertial Measurement Unit) code given on their website are quite unexpected errors. On official website of Arduino, such errors for the beginners of Alvik learners will prove to be very problematic and will surely create lot of headache.
So after studying the official code of IMU for Arduino Alvik, I have tweaked it and now giving the lab tested code of the same, below.
The Arduino Alvik lovers are free to use this code for their study with Arduino Alvik.
Your comments and suggestions are highly appreciated.
The Corrected Code
# Lab Tested Code by Vidyasagar Academy
from arduino_alvik import ArduinoAlvik
import time

# Initialization
alvik = ArduinoAlvik()
alvik.begin()

# Give some time for initialization
while True:
  #alvik.set_wheels_speed(30,30)
  orientation = alvik.get_orientation()
  acceleration = alvik.get_accelerations()
  angular_acceleration = alvik.get_gyros()
  print(f'Orientation: {orientation}')
  print(f'Acceleration: {acceleration}')
  print(f'Angular Acceleration: {angular_acceleration}')
  time.sleep(5)
The Faulty ‘Official’ Code (1) of Arduino Alvik for IMU
The following code is faulty code given on official website of Arduino Alvik. DO NOT USE THIS CODE. Instead use the lab tested code given at the top of this article.
from arduino_alvik import ArduinoAlvik
import time

# Initialization
alvik = ArduinoAlvik()
alvik.begin()

# Give some time for initialization
time.sleep(2)

# Get orientation
orientation = alvik.get_orientation()
roll = orientation['r']
pitch = orientation['p']
yaw = orientation['y']
print(f"Orientation - Roll: {roll}, Pitch: {pitch}, Yaw: {yaw}")

# Get accelerations
accelerations = alvik.get_accelerations()
ax = accelerations['ax']
ay = accelerations['ay']
az = accelerations['az']
print(f"Acceleration - X: {ax}, Y: {ay}, Z: {az}")

# Get gyros
gyros = alvik.get_gyros()
gx = gyros['gx']
gy = gyros['gy']
gz = gyros['gz']
print(f"Gyro - X: {gx}, Y: {gy}, Z: {gz}")

# Combine all IMU readings
imu_readings = alvik.get_imu()
ax = imu_readings['ax']
ay = imu_readings['ay']
az = imu_readings['az']
gx = imu_readings['gx']
gy = imu_readings['gy']
gz = imu_readings['gz']

print(f"IMU Readings - Acceleration: X: {ax}, Y: {ay}, Z: {az}, Gyro: X: {gx}, Y: {gy}, Z: {gz}")
The Faulty ‘Official’ Code (2) of Arduino Alvik for IMU
Please read what they said on their official website, below –
Now that we’ve got a solid grasp on how the IMU works and how to interact with it, let’s put this knowledge to use in a practical scenario. Events like falls and crashes are critical for a robot, as they often result from sudden changes in linear acceleration (movement along the x, y, or z axes) or angular velocity (rotational movement around these axes). By monitoring these specific changes, we can effectively detect such incidents and respond accordingly. In the following example, we’ll create a sketch that uses the IMU to identify falls and crashes. The sketch will look for sudden spikes in linear acceleration or angular velocity, using set thresholds to accurately determine when these events occur. Here’s how you can implement this functionality:
The ‘Official’ Faulty Code (2)
The following code is faulty code given on official website of Arduino Alvik. DO NOT USE THIS CODE. Instead use the lab tested code given at the top of this article.
from arduino_alvik import ArduinoAlvik
import time

# Initialize the Alvik robot
alvik = ArduinoAlvik()
alvik.begin()

# Function to detect falling and crashes
def detect_fall_or_crash():
    imu_readings = alvik.get_imu()

    ax = imu_readings['ax']
    ay = imu_readings['ay']
    az = imu_readings['az']
    gx = imu_readings['gx']
    gy = imu_readings['gy']
    gz = imu_readings['gz']

    # Thresholds for detecting a fall or crash (example values)
    acceleration_threshold = 2.5
    angular_acceleration_threshold = 1.0

    if abs(ax) > acceleration_threshold or abs(ay) > acceleration_threshold or abs(az) > acceleration_threshold:
        print("Fall or crash detected based on acceleration!")

    if abs(gx) > angular_acceleration_threshold or abs(gy) > angular_acceleration_threshold or abs(gz) > angular_acceleration_threshold:
        print("Fall or crash detected based on angular acceleration!")

while True:
    detect_fall_or_crash()
    time.sleep(0.1)  # Adjust the sleep time as needed
Quick Links
- Achieving control and orientation with Arduino Alvik on rotating platform
- Arduino Alvik: How to write the blinking LED code?
- How to write code for alternate Blinking LEDs with different colors in Arduino Alvik?
- How to move Arduino Alvik forward and backward using simple code?
- How to give turns to Arduino Alvik using simple code?
- Simple black line follower code for Arduino Alvik


Very useful post. I recently purchased Alvik but on the official website of Arduino there is no good information about its coding. Thanks for the series you are publishing on Alvik.
Its very useful.
Thanks for the 5 star rating.
If you have any questions regarding Alvik, we would love to hear.
It will help us understand the actual requirement of the hobbyists working on Alvik.